3D Layered Frog: Creative Cut Projects
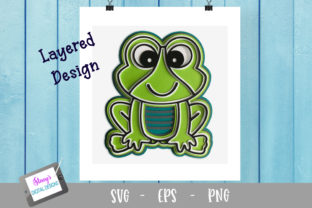
There is something inherently satisfying about watching a flat design transform into a dimensional object. The 3D Layered Frog exemplifies this magic perfectly. It is not merely a graphic; it is an architectural blueprint for a charming, tactile creation that relies on the simple yet powerful technique of stacking layers. This specific design consists of five distinct components that, when assembled, create a depth and character that a single-piece cut simply cannot achieve.
The appeal of this project lies in its versatility. Whether you are working with cardstock for a greeting card, wood for a rustic home decor piece, or acrylic for a modern display, the underlying structure remains the same. The design has been tested at approximately 5 x 6 inches, providing a substantial presence without being overwhelming. While smaller cuts are technically possible, sticking to the recommended size ensures that the individual layers remain distinct and the final assembly is stable and visually balanced.
Understanding the Structure and Assembly
To get the best results from your 3D Layered Frog, understanding the file architecture is crucial. The package includes SVG, PNG, EPS, and JPG files, giving you flexibility across different software platforms and cutting machines. However, there is a specific detail regarding the mouth pieces that requires attention during the setup phase. The two mouth pieces are designed to cut separately from the main body layers, even though they appear attached in the preview image.
This separation is intentional. Once the primary five layers are stacked and secured, the mouth pieces are added last, stacking specifically on top of layer three. This step-by-step approach allows for greater control over the final expression of the frog. If you were to cut everything as one solid block, you might lose the ability to adjust the position of the mouth or ensure it sits flush against the face. Treating these elements as separate entities gives you the freedom to align them perfectly, ensuring the character looks lively and engaging.
Creative Applications Across Materials
One of the most exciting aspects of this design is how it adapts to various substrates. The choice of material fundamentally changes the mood and utility of the finished product. For hobbyists and small business owners, experimenting with different textures can turn a simple craft into a premium item.
- Paper and Cardstock: This is the most accessible medium. Using textured cardstock, such as kraft paper or watercolor blends, adds warmth and a handmade feel. This is ideal for wedding invitations, nursery decorations, or educational materials where a soft aesthetic is preferred.
- Wood: Cutting the layers from balsa or basswood creates a sturdy, natural look. The grain of the wood adds organic variation to each layer, making every frog unique. These work beautifully as shelf sitters, keychains, or part of a larger woodland-themed display.
- Acrylic: For a contemporary twist, clear or colored acrylic sheets offer a sleek, modern finish. The transparency of the material allows light to pass through the layers, creating interesting shadow play. This is excellent for desk accessories or high-end retail displays.
When selecting your material, consider the thickness. Since the design relies on stacking, using materials that are too thick might make the final object unwieldy or difficult to glue securely. Conversely, materials that are too thin may lack the structural integrity needed to stand upright. Finding that sweet spot is key to a professional-looking result.
Ideas for Engagement and Storytelling
Designers and educators often look for ways to make their content more interactive. The 3D Layered Frog offers a perfect vehicle for storytelling. In a classroom setting, teachers can use the layers to explain concepts of depth, perspective, or biology. Students can assemble the frog while learning about the life cycle of amphibians or the properties of geometric shapes.
For marketers and entrepreneurs, this design serves as a versatile asset for brand campaigns. Imagine a seasonal promotion where customers receive a layered frog kit as a free gift with purchase. The act of assembling the toy increases engagement time and emotional connection with the brand. You could also adapt the colors of the layers to match your company's palette, turning a generic animal shape into a branded mascot.
Bloggers and content creators can leverage the visual nature of the project for social media. The process of stacking the layers is highly "Instagrammable." Documenting the transformation from flat sheets to a 3D figure provides compelling video content. You can share tips on alignment, discuss material choices, or showcase the final product in different lighting conditions. This type of content resonates well because it is both educational and entertaining.
Optimizing Your Workflow
Efficiency is just as important as creativity. To ensure your projects run smoothly, organization is paramount. Before you begin cutting, take a moment to review the included JPG file. This visual guide helps you understand the order of operations and how the layers interlock. Labeling your cut pieces immediately after they come off the mat prevents confusion later on.
Consider using foam adhesive pads between the layers if you want to emphasize the 3D effect further. This creates a gap between the layers, casting subtle shadows that enhance the perception of depth. However, if you prefer a tighter, flatter profile, standard craft glue will suffice. The choice depends on the desired aesthetic and the rigidity of your chosen material.
Remember that consistency is vital for a polished look. Ensure that all layers are cut from the same batch of material to avoid color variations. If you are using wood, try to select planks with similar grain patterns so the transition between layers feels cohesive. These small details often distinguish a mass-produced item from a handcrafted treasure.
Adapting for Diverse Audiences
The beauty of this design is its scalability. While the recommended size is 5 x 6 inches, the vector nature of the SVG file means you can scale the design up for large wall art or down for miniature charms. Just be mindful that scaling down too much might make the mouth pieces difficult to handle. For very small versions, you might need to omit the separate mouth layer and print it directly onto the face layer.
Freelancers and publishers can also find value here. The clean lines and friendly character make it suitable for book illustrations, website graphics, or printable activity sheets. By offering the digital files alongside physical products, you create multiple revenue streams. A customer might buy the physical kit for a child but download the digital version to print extra copies for a party favor.
Ultimately, the 3D Layered Frog is more than just a cute animal shape. It is a tool for expression, education, and commerce. It invites users to slow down, focus on the details, and appreciate the joy of building something with their own hands. Whether you are a seasoned crafter or someone looking for a new creative outlet, this project offers a structured yet open-ended canvas for your imagination. By respecting the design's requirements and exploring its potential across different mediums, you can create projects that are not only visually stunning but also deeply meaningful.